
As mentioned in my last free inquiry post, I was very interested in the idea of animating with procreate. There are dozens of tutorials YouTube about this process. Some tutorials, like this one below by illustrateria are very useful to see how other are using the animation function, but they are more tutorials to follow and create the same images and animations. Basically her entire catalogue of videos follow the same follow along style, where the viewer is creating the same image as the video. I can pull some useful tips from this video, and can take some of the techniques used to put in my own tool belt, but I am less interested in learning to animate an identical lemon, and more interested in learning techniques to use in my own unique animations. This brief video doesn’t go as in depth as I would like, as a novice. Though I got a fair bit from this one, I really needed to find a tutorial that started from the ground up and assume the viewer (me) doesn’t know what they’re doing.
In contrast, this video by Bardot Brush is a little more useful. She indicates 5 different ways she uses Procreate to create animated GIFs. Not only does she show how she animated her GIFs, but she also goes into depth about the process from beginning to end for all 5 different animation styles she’s sharing. There is the expectation that the viewer is new to this process and she goes as far as to show how to export the GIFs once you have finished.
Some important points to take away from this video are:
- export layers as animated GIFs
- each visible layer becomes a frame in your animation
- creates a gif that loops indefinitely
- adjusting frames per second
- transparent backgrounds
- optimized cavasses for GIF format (in pixels) to create sharp hi-res animations
- Square: 1800 x 1800
- Horizontal: 1920 x 1400
- Vertical: 1920 x 2500
- more frames makes a smoother animation
Wiggly animation
Wiggle Animation Test, Rena Kanya via Procreate
The first method she used was simple, but effective. The wiggly animation creates text (or any image) and causes it to wiggle. This effect is created by first choosing a brush and writing something on the first layer, and then turning the opacity of that layer down to about 50%. On the next layer you simply rewrite the text from the first layer and then turn off that layer before making another layer and repeating the process. You continue this for at least 3 more layers. When you’re finished make sure all layers are turned back on and the first layer’s opacity is back up to 100%. This animation is now ready for export!
Animation By Erasing
Animation By Erasing test, Rena Kanya via Procreate
This technique is pretty straight forward. You start with a whole image, which must be all in one layer (she uses a doughnut). You duplicate this image into the next layer and turn off the viability of the previous layer. Then all you do is erase away a section of your image. She did this by creating bite marks in the doughnut. Then this process is continued until the doughnut, or whatever image you are working with is gone. Once done, turn all the viability back on and the image, when animated, should show the doughnut getting eaten until it is gone.
Let’s Stop Here For Today
I am going to stop there for now and continue with more animation in my next post. This has turned out to be very fun and I am reminded of my 2D animation course I took in my undergrad. For fun I took one of the loops I had hand drawn for that class, cropped my frames and threw them into procreate layers to see how the animation would look as a GIF. It’s not perfect, but it was a nice flash from the past for me. Enjoy my reverse mermaid walking.
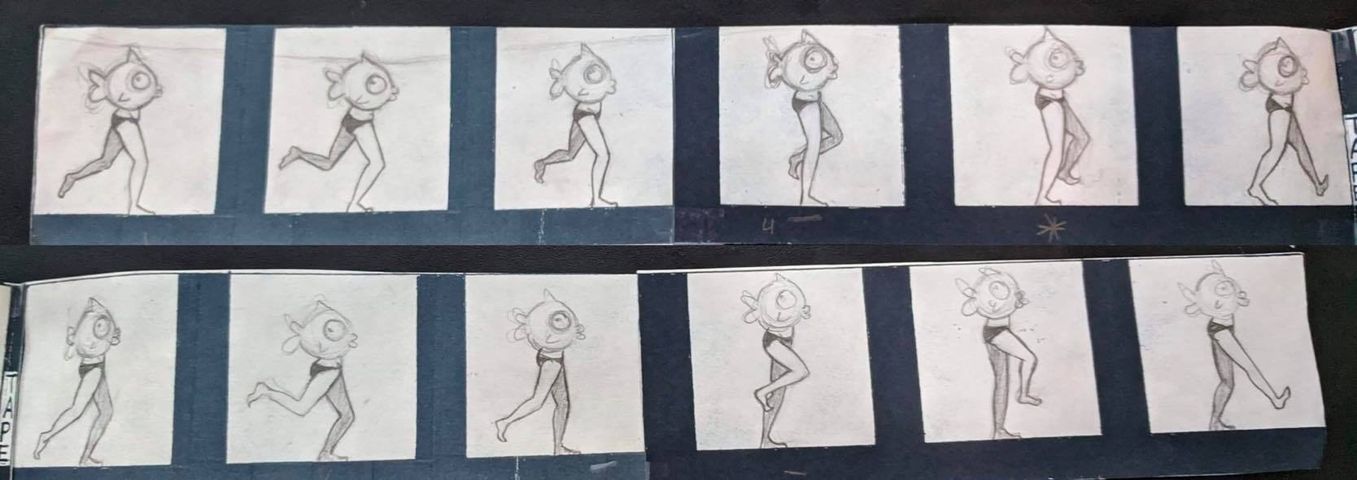
hand drawn animation loop, Rena Kanya
Hand drawn animation loop, Rena Kanya, GIF made in Procreate
November 17, 2020 at 1:17 pm
Rena,
Thanks so much for sharing this post! I love the animations and they layout of the post. It makes it easy to follow and know exactly what you want your readers to get out of it.
I specifically liked your use of headings and bolding. It really made it feel professional and easy to follow.
I wonder if there could be a glossary or something for us non-artists?
November 17, 2020 at 1:23 pm
Really enjoyed this post, I thought it was detailed and covered a lot!
I thought that you provided two different video tutorials with your review was great.
I enjoyed the little gif’s that you made, and the fact that they don’t seem impossible for newbies to create makes the content relatable.
There were a couple little grammar/spelling errors in the first paragraph.
Overall I thought the post was really fun!